Crystals are, in a word, cool. It doesn't seem to matter how old you are or how many amazing things you've seen in your life, there is just something about how they grow and their infinite uniqueness that inspires a little bit of awe in all of us. So, whether you're cooped up at home at the moment or just looking for a fun speech, language, and occupational therapy activity that will make everyone smile, we've got you covered with our new magical, mystical Crystals activity sheet! Here are a few recommendations from our Hello Clinic therapists for what you might work on while doing this project:
Occupational therapy targets to work on while making crystals:
- Fine motor: Work on fine motor and bilateral coordination skills via tying strings to the pipe cleaners, twisting pipe cleaners, squeezing food coloring, and stirring.
- Time/material management and problem-solving: Sequence a multistep recipe with various measurements and times to keep track of.
- Visual perceptual: Increase visual perceptual skills by creating or copying pipe cleaner designs/patterns.
- Safety awareness: This project helps children learn about safety in the kitchen and builds skills they will need to be independent as they grow.
- Self-regulation: Sometimes it can be hard for kids to wait until they see their finished project. This project indirectly works on self-regulation as it provides delayed gratification and takes patience.
Speech and language targets to work on while making crystals:
- Articulation: Practice some challenging /r/ words: crystal, string, jar, borax, pipe cleaner, water, color, measure, overnight, center, reheat.
- Compare and contrast: Collect some rocks and compare them to the borax crystal you made. Talk about how they are the same and how they are different. You can sort them in groups and practice vocabulary to describe the attributes as related to size, texture, shape, etc.
- Sequencing: As you follow the directions, use key vocabulary words (first, next, then, last) to talk about what you are doing as you follow each step. Cut out the pictures, mix them up, and then put them back in the correct order.
- Re-tell: Find a friend or family member and tell them how to make crystals. Bring the pictures for a visual aid, and remember that sandy sequencing vocabulary again!
- Inquiry: Go to the library and find some books to learn more about rocks. Some titles to look for include Rocks, Rocks, Rocks by Nancy Elizabeth Warren and Let's Go Rock Collecting by Roma Gans.
Sounds like fun, doesn't it? Grow something amazing!
How to Make Crystals in 6 steps
Have fun and be sure to have an adult help you!
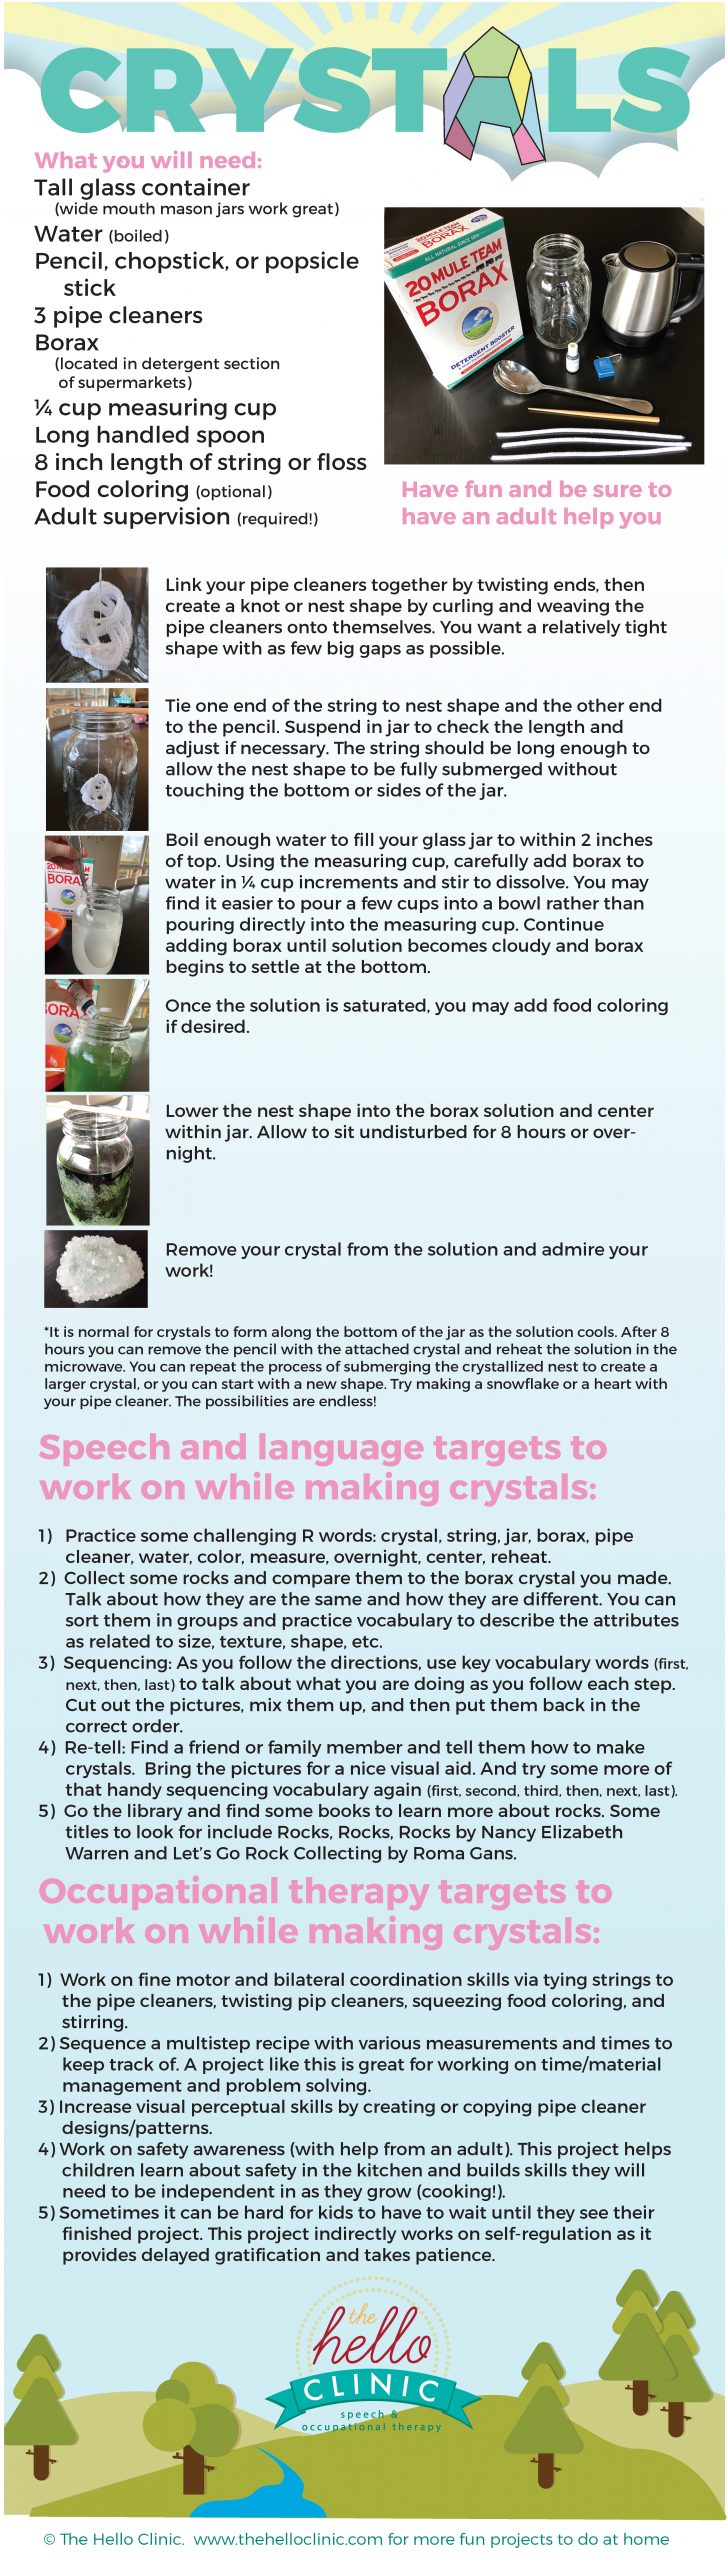
What you will need:
- Tall glass container (wide-mouth mason jars work great)
- Water (boiled)
- Pencil, chopstick, or popsicle stick
- Borax (located in the detergent section of supermarkets)
- 1/4 Cup measuring cup
- 8 inch length of string or floss
- Food coloring (optional)
- Adult supervision (required!)
Step 1. Link your pipe cleaners together by twisting ends, then create a knot or nest shape by curling and weaving the pipe cleaners onto themselves. You want a relatively tight shape with as few big gaps as possible.
Step 2. Tie one end of the string to the nest shape and the other end to the pencil. Suspend the string in the jar to check the length and adjust if necessary. The string should be long enough to fully submerge the nest shape without touching the bottom or sides of the jar.
Step 3. Boil enough water to fill your glass jar to within 2 inches of the top. Using the measuring cup, carefully add Borax to the water in 1/4 cup increments and stir to dissolve. You may find it easier to pour a few cups into a bowl rather than directly into the measuring cup. Continue adding borax until the solution becomes cloudy and the borax begins to settle at the bottom.
Step 4. Once the solution is saturated, you may add food coloring if desired.
Step 5. Lower the nest shape into the borax solution and center within the jar. Allow to sit undisturbed for 8 hours or overnight.
Step 6. Remove your crystal from the solution and admire your work!
Note: It is normal for crystals to form along the bottom of the jar as the solution cools. After 8 hours, you can remove the pencil with the attached crystal and reheat the solution in the microwave. You can repeat the process of submerging the crystallized nest to create a larger crystal, or you can start with a new shape. Try making a snowflake or a heart with your pipe cleaner, the possibilities are endless!
